Neue Person
General
A click on "New person" starts the process for creating a new employee.

The following input mask then opens:
| Vergrößern |
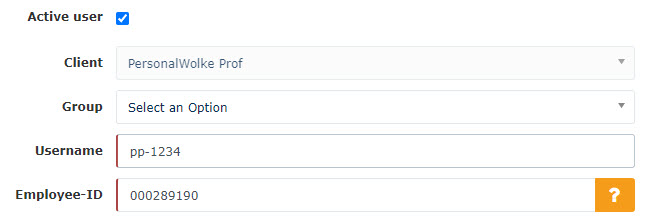
The fields marked with a red line must be filled in while the unmarked fields are optional.
After entering your first name and surname, you have to select your company under Client and then a group to which the person should belong.
Note: In principle, the required hierarchical groups (departments) should be created BEFORE persons are created, since a new employee must be assigned directly!
| Vergrößern |
Important: After saving the person, it MUST be added to at least the loose group "xxx-ALLE" under the newly appearing tab Groups (not visible before saving). Otherwise no menu tree is available to the user after the login!
After selecting the client, the fields User name and Personnel number are automatically filled with fixed client-specific prefixes (in this example, "pb" and "0001"). Except for these two prefixes, the user name and personnel number can be freely selected - but must be unique within the company.

ZEF Master record number is automatically filled by the system and cannot be changed.
E-mail notification controls whether the user should receive an e-mail when new requests for approval / review are received.
E-mail notification as a deputy analogous to the point E-mail notification, only from the viewpoint of the deputy
Activates / deactivates the deputy regulation, i.e. the deputy is authorized / not authorized to approve proposals.
E-mail the e-mail address of the user to whom the notifications will be delivered.
As already mentioned, the other fields are optional and self-explanatory.
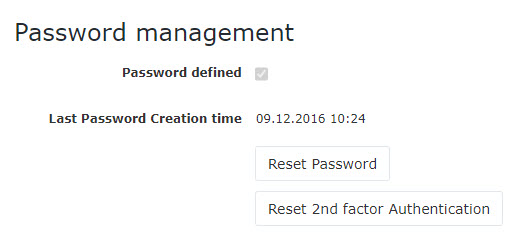
Once all fields have been filled in, the person can be created by clicking on Save. The successful saving is confirmed with a corresponding message (person 'Mustermann Max' was saved successfully!). Only now can the password for the user be reset to the default password (=user name) by clicking the Reset password button. This must be changed when the user logs in for the first time.
Password-Management
After saving a person, the password of the user can be reset to the default password using Reset Password.
Note: The default password corresponds to the user name including prefix (case sensitive!) and must be changed after the first login!

People Management
After successful saving, the additional tabs Groups, Roles, Action permissions, In the competence area of these role owners and Modules appear.
Vergrößern
Tab: Groups
Under Groups, you can change the assignment to a hierarchical group (organization chart) and add the assignment to a lot group.
Hierarchical Groups
| Vergrößern |
Here you can see that the selected user is currently assigned to the group PB-AGB1 (Geschäftsbereich 1) in the organization chart PP. With Valid from and Valid to, you can define a period in which the person is assigned to a particular group. Under New Group, you can select another group and define a time period for the validity of the group membership. The check mark at with past determines whether expired (past) group memberships should also be displayed in the list of group memberships.
As an example: Mr. Müller works until 02.05.2013 in the PP-ENTW group and is to belong to the PP-AGB1 group from 03.05.2013. To realize this automatically, the Valid until date can already be changed to 02.05.2013 and the group PB-AGB1 with Valid from 03.05.2013 can be saved under new group. Thus the group change takes place automatically on the specified key date.
Note: A person can only be a member of one hierarchical group at a time!
Loose Groups
Under Loose groups you can define the affiliation to several non-hierarchical groups. The number of loose groups to which the employee can be assigned is unlimited.
Note: The user must always be assigned to the loose group xx-ALLE - otherwise no menu tree is available after login!
| Vergrößern |
(This screenshot shows the 3 standard loose groups. The new user must be assigned at least to the group xx-ALLE (PP-ALLE).)
In order to offer the user additional rights (also in the Project-Time and Travel modules), he must also be added to one of the following loose groups!
Personalwolke Time:
|
PP-ALLE |
PP-ALLE + PP-Management |
PP-ALLE + PP-Admin |
|---|---|---|
|
Standard-Group - every user MUST be assigned to this group! |
Management-Group - users who are added to this group receive additional menu items for the evaluation of company employees - Accounts evaluation, Calendar overview, Yearly calendar und Statistics. |
Administrator-Group -Users added to this group get additional menu items for managing the Organigramms, People, Groups and Roles, as well as the ability to Switch users to view the Personalwolke from the perspective of the selected user. |
Of course it is also possible to add a user to all loose groups and thus unlock the administration AND management menu items to the user or a simple standard user is created which is only added to the loose group PP-ALLE.
The menu item Time management --> Correction client represents a special case. Only persons who have assigned the Personnel role can use this correction client (regardless of the loose groups to which they have been added) to change bookings. In some cases users can also use correction client for tracking time.
Personalwolke Travel
If you are a user of the "Travel" module, the following loose groups are also available for managing user rights:
|
PP-TM-User |
PP-TM-Manager |
PP-TM-Admin |
|---|---|---|
|
|
|
Personalwolke Project-Time
If you are a user of the "Project Time" module, the following loose groups are also available for managing user rights:
|
PP-PTM-Usr |
PP-PTM-Mgm |
PP-PTM-ProjMngr |
PP-PTM-Admin |
|---|---|---|---|
|
|
|
|
How to add user to a group
We select the PP-ALLE group and click Save. This assigns the employee to the loose group PP-ALLE.
| Vergrößern |
In summary, it can be said that when creating a new person regarding the groups / roles, the following things must be considered:
- Person has to be assigned to exactly one hierarchical group.
- Person has to be assigned to the loose group PP-ALLE.
- Person gets optional additional rights by adding to loose groups
- PP management and / or PP admin (when using the time module)
- PP-TM user / PP-TM manager / PP-TM admin (when using the travel module)
- PP-PTM-User / PP-PTM-Mgm / PP-PTM-ProjMngr / PP-PTM-Admin (when using the project time module)
- Person gets optional additional rights (correction client) by adding the role Personnel
Role assignment for managers and personnel is explained in the next section.
Tab: Roles
Under Roles, you can find an overview of the roles assigned to this person in the company. The following screenshot shows that the person has some roles assigned.
| Vergrößern |
If the employee is now to be assigned another role (superior, personnel), this is done by clicking on the New Role Holder button.
| Vergrößern |
- New role assignment Selection of the role through clicking on the 3 horizontal dots (manager (Vorgesetzter), personnel (Personal) to be assigned to the employee.
- Competence target refers to the person/group for which the employee is to be responsible.
- Valid from / Valid to describes the period in which the employee is assigned the selected role.
- The order determines the deputy (sequence 1 = superior, 2 = deputy, 3,4 = if several persons are defined as deputies, the system determines who receives an application for processing).
Example: New role assignment "Vorgesetzter", competence objective: group, "PB-ENTW (development)" - this means that the person performs the role of superior for the group PB-ENTW, i.e. all applications submitted by a person from the group PB-ENTW and requiring approval / review by the role of superior end up with this person. Of course, a special person could also be appointed instead of the group. In this case, the Superior role only applies to the person who was defined.
A person can be assigned several roles with different competence goals!
| Vergrößern |
The assigned roles can also be withdrawn / changed from the user by means of Delete (Bin Symbol)/ Edit (Edit Symbol).
Tab: Action authorizations
No changes can be made under Action authorizations.
For the sake of good order, however, it should be mentioned that the actions that can be called by the members of the group are displayed here.
Tab: In the area of competence of these role holders
In this tab one finds an overview of the persons who are "responsible" for the user, for example Huber Peter is the manager of the user.
| Vergrößern |
Tab: Modules
Travel
In the tab Travel you can add vehicles. These vehicles can be selected by the person (when using the Travel module) in the Kilometre allowance tab of Travel Expenses. This makes it possible to keep a virtual logbook. After a click on the button Add the following mask appears:
| Vergrößern |
Explanation of the individual table columns:
-
Indicator
The complete registration number of the registered vehicle must be indicated here. -
Type
In this dropdown element, a distinction must be made between passenger cars, motorcycles and trucks. -
Brand
The car / motorcycle / truck brand must be entered here by direct input. -
Model
Optionally, the model can also be entered here for specification in addition to the brand. -
Number of seats
Here you have the possibility to indicate the number of carpooling opportunities. -
Fuel
In this field, you can enter whether the vehicle is powered by petrol / diesel / electricity / biofuel / etc. -
Valid from and Valid to
These mandatory fields must be used to determine how long the vehicle is visible in the Mileage allowance tab of Travel Expenses.
After filling in this form, the entry must be accepted by clicking on the Save button. Any number of vehicles per person can be added. By clicking the Bin Symbol (next to the Valid to field), added vehicles can be removed again.
Groupware
If the optional groupware module has been ordered, you can check if the connection to the groupware system (currently Microsoft Exchange, LotusNotes and ZIMBRA are supported) is working. No changes can be made - this tab only provides a status view.
Time recording
In order to activate time recording for the user, the check mark for Activate time recording must be set in this view. Afterwards one of the preset weekly programs must be selected!
After checking the box and selecting a week program, the settings are saved with Save.
| Vergrößern |
Daily settlement
With the button Daily accounting this can be started. After clicking on the button, a window opens in which further settings must be made:
| Vergrößern |
- From
- Enter the date from which the daily billing is to be started (each day is recalculated starting with the set date according to the selected mode up to the current day).
- Modus
- Copy time models and authorizations from master record
- Re-billing with historical time model references
- Time model from historically set weekly program
With a click on "Start daily accounting" the daily accounting is started according to the selected settings.
Master Data
Subsequently, some settings should be made under Master data in the second third of the window. Further information can be found here.
Keine Kommentare vorhanden.